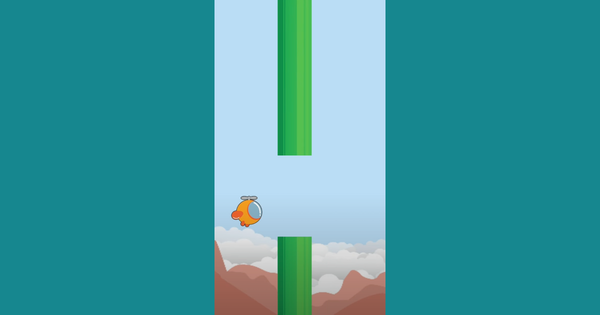
Today we are going to make a game from scratch inspired by recently popular spike games. We will call it Oh My Spikes. Before we start, you may want to see how the final game will look like. This will help you follow the tutorial easily.
I am assuming you have some experience using App Inventor. If not, you should definitely do the very basic tutorial.
This is what we want to achieve-
1. You control a bird by tapping anywhere in the screen. When you tap, bird ascends; if you don't, bird starts to descend/fall.
2. Your objective is to lead the bird to left or right without bumping on any spikes. If you successfully take the bird to the left or to the right edge, you make a score. When that happens, bird goes to opposite direction. This continues until you hit a spike. Let's first design the interface. Download the barebone project that already has the UI layout but no blocks. Import it and take a look at the different components in place. You can change the look and feel however you want later. This is how mine looks like-
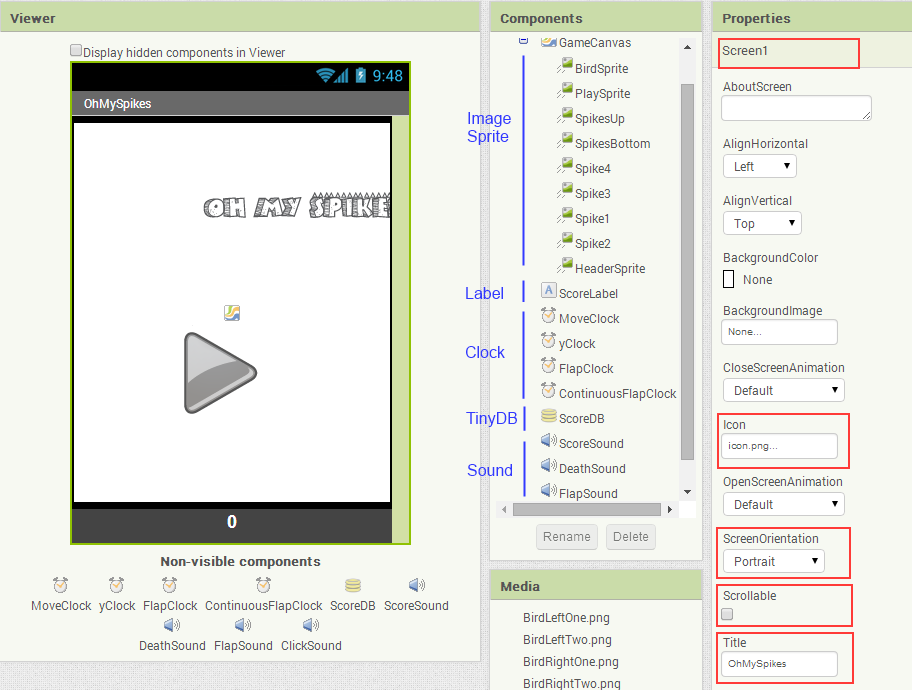
We have the following components in Screen1:
1. A Canvas component which we renamed to GameCanvas with Height and Width both set to Fill parent.
2. We have an ImageSprite component to represent our main game object which is a tiny bird. We named it BirdSprite. The speed property of this sprite is set to 5 meaning 5 pixels.
3. Another image sprite named PlaySprite to represent our play/retry button.
4. SpikesBottom and SpikesUp are also image sprites for spikes on the top and bottom as the names implied.
5. Spike1, Spike2, Spike3, and Spike4 are image sprites that will be placed in random locations during the game.
6. A Label component named ScoreLabel to display the score.
7. Four Sound components for playing sound effects. ScoreSound is used when the player makes a score. FlapSound is when the player taps on the canvas for bird to flap and ascend. DeathSound is used when the bird bumps on any of the spikes and dies. Finally the ClickSound is for Play/Retry button click.
8. We do have a TinyDB component named ScoreDB to store the best score.
9. There are four Clock components. MoveClock is used to control how long the bird can fly up when the player taps the screen. When MoveClock is fired, we stop flying up. MoveClock's TimerInterval is set to 300 milliseconds in design view. yClock is to control bird's location on y-axis which has an interval set to 0. ContinuousFlapClock is for making the bird flap nonstop. FlapClock is for making the bird flap once when it jumps. We could actually use one flap clock but for simplicity sake and avoiding too many blocks by resetting their properties, we used two. Now, let's define some variables that we'll need throughout the game. I will explain what they are for in a bit.

DB_SCORE_TAG : For saving and reading best score.
STATE_MENU, STATE_READY, STATE_GAME - A game has states. When you are on the menu screen, ready to start the game, and actually playing the game. These variables are constant meaning we will not change their values. That is why we used all capital letters to define them.
state - This holds the current state, either of the three states above.
isFalling - When player is not tapping, the bird starts to descend.
score - Current score in the game.
bestScore - Best score of the player.
headingLeft - Bird's direction on x-axis, either left or right.
temp - To use within a smaller scope. You can use local variables if you prefer.
isOnLeft - If the obstacles/spikes are currently at the left side on the canvas.
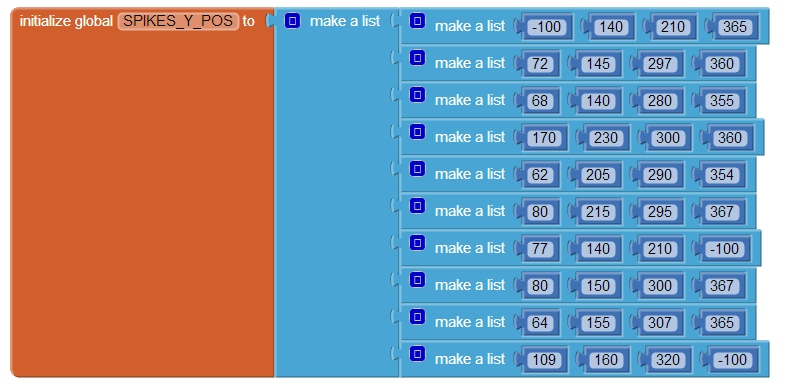
SPIKES_Y_POS - This variable holds a list of lists. We have 4 image sprites (obstacle spikes) that are placed on either side depending on the direction of the bird. If we want to place the spikes at left, we can use 0 as the x, if we want to the right, we can use canvas' width minus spike's width for x. Since our obstacles' x position is either to the left or to the right, all we need are values on y-axis. We created 10 locations for those sprites by placing them in various positions in design view with proper gaps in between, we then checked in the device if they look good enough. Then we copied Y values from design view to SPIKES_Y_POS variable. Since we have 4 obstacle sprites, we chose 4 values on y-axis, one for each sprite. This is why each list contains 4 items. First one is for Sprite 1, 2nd one is for Sprite 2, and so on. You can try and add more or even randomize. Rather than having a list of lists predefined, you can create an empty list and then later add items to that list instead. If you are wondering why some of them have -100, it's because we don't always want to show all 4 obstacle sprites. So we placed them off the screen. You can use -30 as each spike is 30 pixels in height. I chose -100 because for some reason it was more visible to my eyes to spot on Blocks window when I was testing. If you have never worked on lists, now is the time you go through the in-depth list tutorial.
Let's initialize/setup different components. Go to Blocks window. Drag the Screen1.Initialize block on the Viewer window and do as I did in Screen1.Initialize. You will also have to create some procedures as shown below:
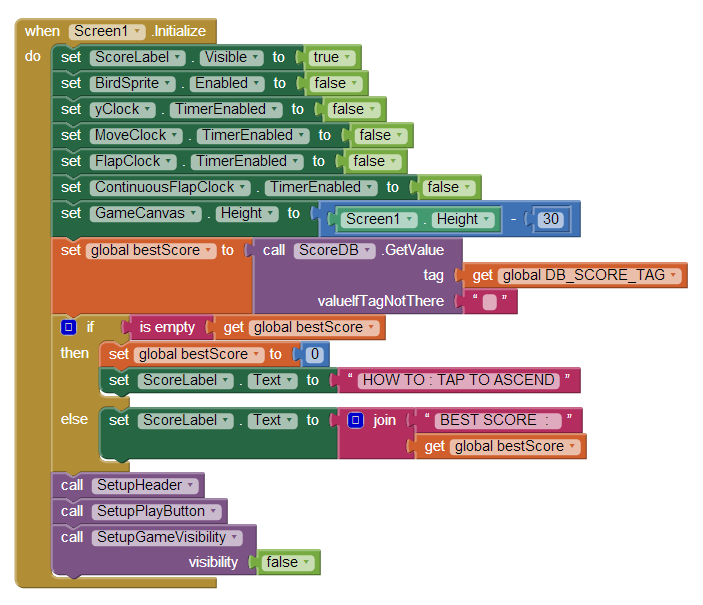


Let's break these down. Screen gets initialized when the app is loaded and we to do the followings when it does-
1. We want our score label to be visible. So we set its visibility to true. You can do that in design view too.
2. When we first show the app, we do not show the bird. So it should not be enabled either. You can also do that in design view. I might have already done that in design view; but I don't like going back and forth to check, so redid it.
3. We do not want our clocks to do anything yet so we disabled them which you can also do in design view.
4. We want our canvas height to be the same as the device height minus the score label's height which is 30. We show the best score on the menu screen or how to play the game if the player haven't played our game yet.
5. We read the best score form TinyDB using the tag we defined before. If no best score, we get an empty text because we put nothing on the block "valueIfTagNotThere". Obviously tag won't be there if we haven't saved any score yet.
6. If we find a best score, we show it. If not, we inform the player how to play this game. You can create a screen with detailed instructions if you prefer and show that instead.
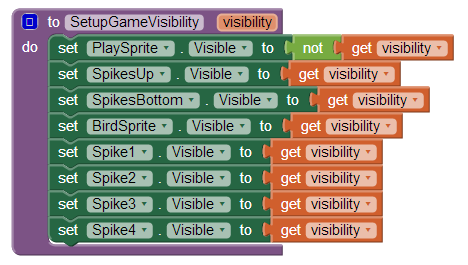
7. Finally we call three procedures. SetupHeader procedure sets the location of the header in center in respect to x-axis and a little below from the top of the screen by using its height. If you are not sure about this simple math formula on getting the center of two points, google 'midpoint formula'. Header holds nothing but the name of the game which is an image sprite and doesn't move or interact. This is why in design view, we disabled that. After we setup its position, we made sure it's visible. SetupPlayButton procedure places the play button at the center of the screen. SetupGameVisibility procedure takes a boolean variable as a parameter. We named the variable visibility. If it is true, we show game components, otherwise we hide it. The reason we used not block from Logic drawer for setting the visibility of play button is because when game starts, we do not want to show the play button but the game items/components. When the game ends, we want to hide all game components except the play/retry button which is also the same when our game launches. That is why we call this procedure with a false argument from Screen1.Initialize, because we want to only show the menu screen's items, not the game screen's items. By the way I am always using "screen" even though there's only one screen (Screen1). I am doing that to differentiate when only menu items (Play button, score label) are visible from game items. Now we have to define what happens when the player presses the play button.
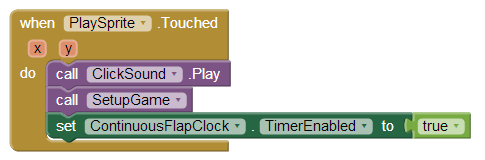
When user/player taps on the play button, we first play a click sound. Then we setup the game which I will explain in a bit. We also start our ContinuousFlapClock as we want the bird to flap continuously. We'll get back to that too. Here's the SetupGame procedure-
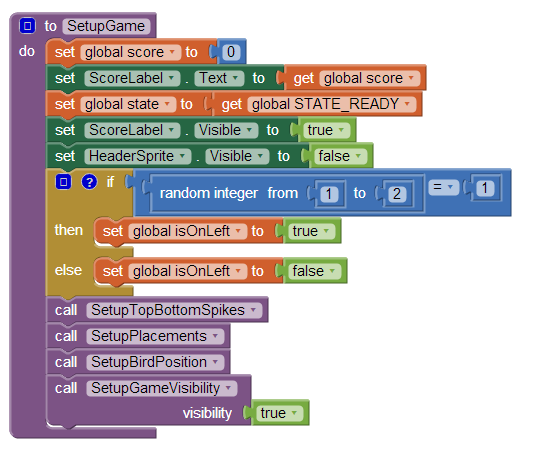
We will discuss 4 procedure calls in SetupGame later. Let's first explain what happens at the beginning. So game is about to start. We want to reset the value of score to 0. Then, we show the score which we just set to 0. We do that because previously the menu screen might have showed best score or a tutorial. We change the state to ready state meaning the game is waiting for player's first tap to start. We make sure our score label is visible and header is invisible. We want to place the obstacles randomly. We do not want to start the game with spikes at the left or right all the time, nor do we want to just alternate. So we pick a number between 1 and 2 inclusive. If system gives us 1, we set the isOnLeft to true, otherwise false. Now let's look at the 4 procedures.
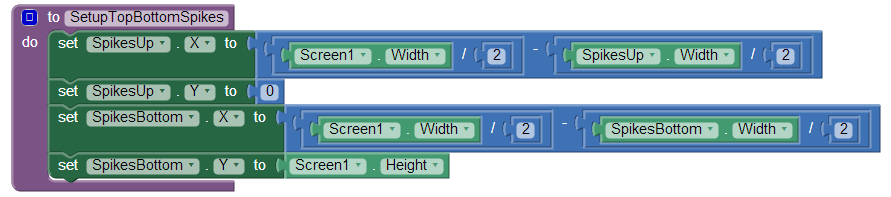
In SetupTopBottomSpikes, we set the X values of both top and bottom sprites to the center on x-axis using simple midpoint formula. Since the SpikesUp should be at the top, we set its Y to 0; and for the other one, we set it to the height of the screen so it appears at the bottom. Remember in canvas, point (0, 0) is on top left of the canvas.
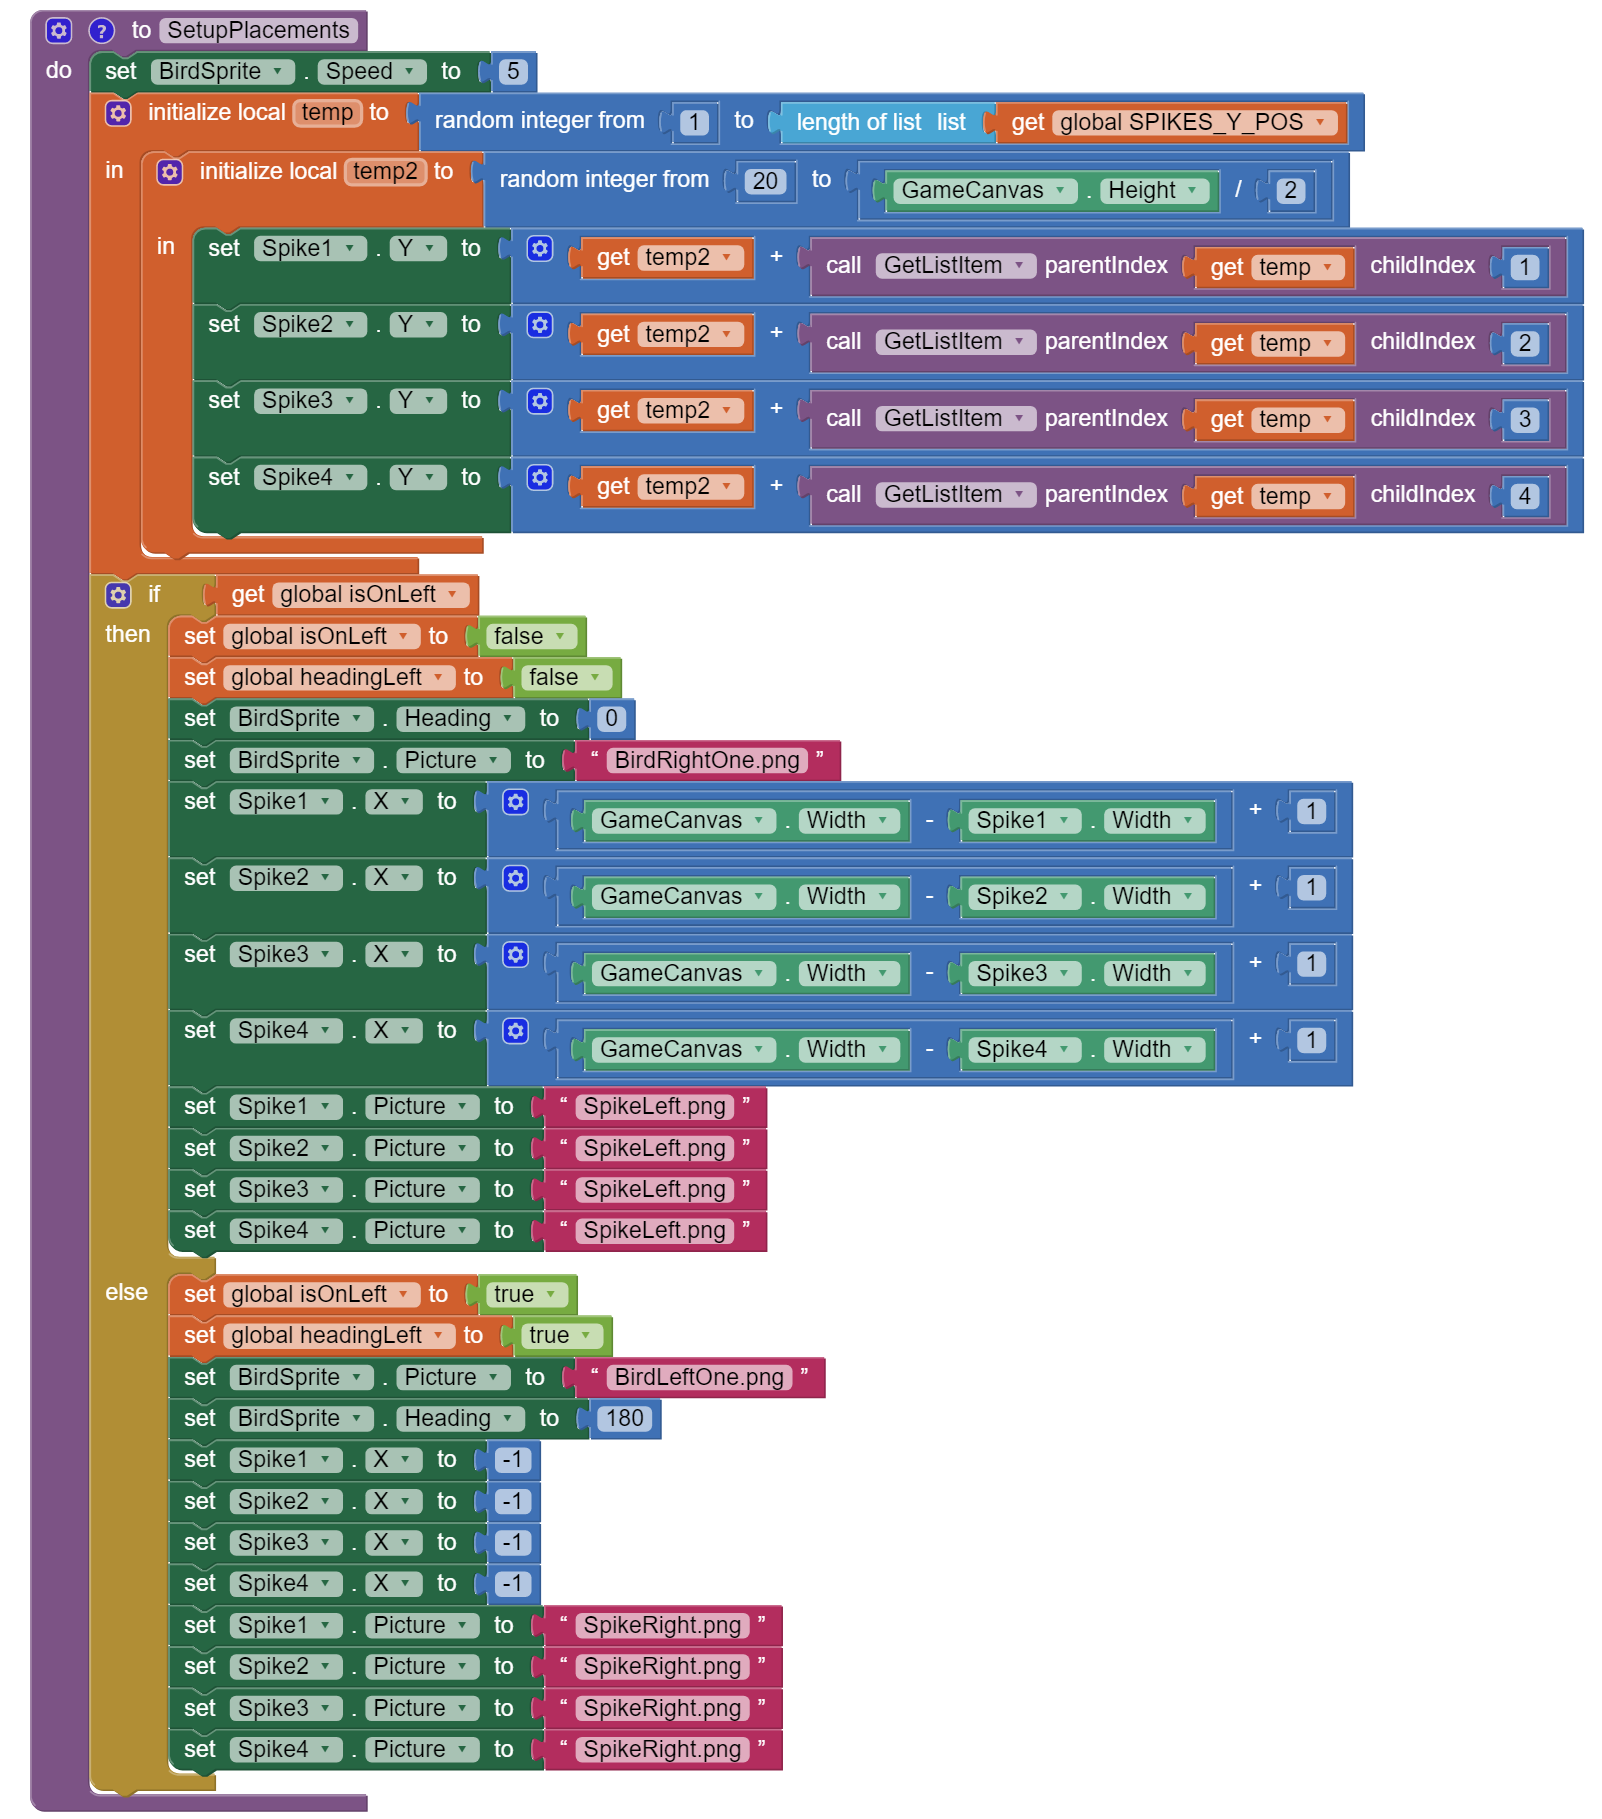
In SetupPlacements, we make sure that bird's speed is 5. You will know why we had to in a bit. Then we determine where we should put all those 4 obstacle spikes in terms of y-axis. As we do have a list of predefined positions contained by SPIKES_Y_POS variable, we just need to pick one from the list. So we generate a number between 1 which is the index of the first item in the list and the size of the list which is 10 as we have 10 items/lists meaning we get a number between 1 and 10 inclusive. After that we get the list at index we just randomly got. The reason we choose a random number between 20 and half of the canvas height, so that we do not place the spikes always on top of the screen. This will make sure we do not have bottom of the screen always available in bigger screens. We do not want to use the same set of blocks multiple times to get a list item, we instead created a procedure called GetListItem which we can easily use instead of using the same set of blocks and make it look too busy-
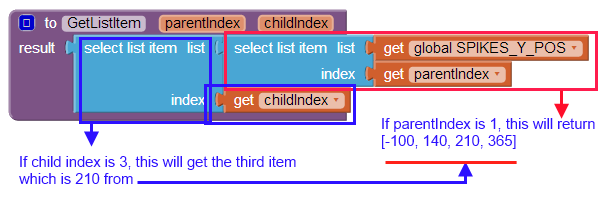
Since SPIKES_Y_POS is a list of lists, the value of the list is also a list. Now if we want the list that contains [-100, 140, 210, 365] which is at index 1 of the parent list, we should give GetListItem 1 as the parentIndex, and then if we want to get the number 210 which is at index 3 of the child list, we should give 3 as the childIndex. Then we check if we should place the obstacles at left using isOnLeft variable's value which we determined in SetupGame procedure.
Now you might be wondering why are we changing the value of isOnLeft again to opposite. It's because SetupGame is called only once when user starts a game but this SetupPlacements will be used each time when the player bounces off an edge. If player bounces off the left edge, we need to put the obstacles at right and vice versa. After that we also change the heading to the opposite of bird's current direction at x-axis. Heading set to 0 makes the bird move rightward. Also we set the image that matches the bird's direction. Since we set isOnLeft to false meaning bird should be moving rightward, we set their X to right edge (canvas width) minus their width. We put an extra pixel (+1) because I kind of find the appearance better that way. You do not have to add that 1.
The name of the image "SpikeLeft.png" may confuse you but tiny spikes on that image is pointing to the left so it should be used when obstacles are placed on the right side. On the else portion, we do exactly the opposite.
Heading 180 makes the bird move leftward. We set obstacles' X to -1 but you can set it to 0. I like it that way. The very same reason why I added 1 when placing them at right.
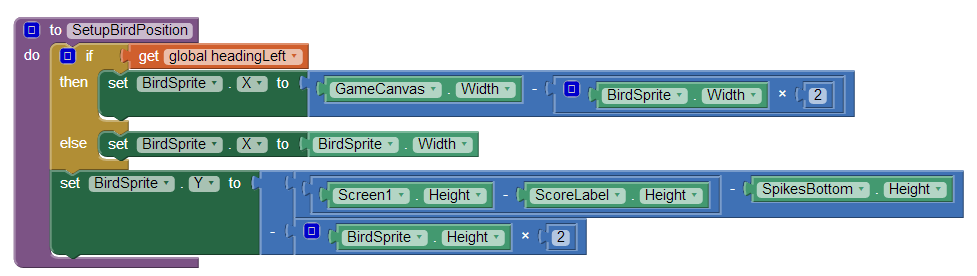
After calling SetupPlacements, we call SetUpBirdPosition in SetupGame procedure. In SetupBirdPosition, depending on the heading we set in the SetupPlacements, we change where the bird should be initially placed when game is in ready state which is actually the opposite side of where we placed the obstacle spikes. You can use the heading property of the bird if you prefer rather than using another variable (headingLeft) as I did. But you have to do a comparison and see if it's 0 (rightward) or 180 (leftward).
Y value is not dependent on the heading. We just need to make sure we don't put it too up or too below where it touches the bottom spike and dies right away. At the end of SetupGame, we call SetupGameVisibility and pass true as an argument, the opposite of what we did when we called this procedure from Screen1.Initialize. It's because this time we want the game entities/components to be visible and play button to be invisible.
We are in ready state. The bird is supposed to flap continuously, but what exactly makes it flap? If you recall, in PlaySprite.Touched event, we enabled the ContinuousFlapClock. In design view, we set this clock's timer interval to 300 milliseconds. So, once it's enabled, after every 300 milliseconds, App Inventor will invoke this clock's Timer event automatically. And this is what we do when it's triggered-
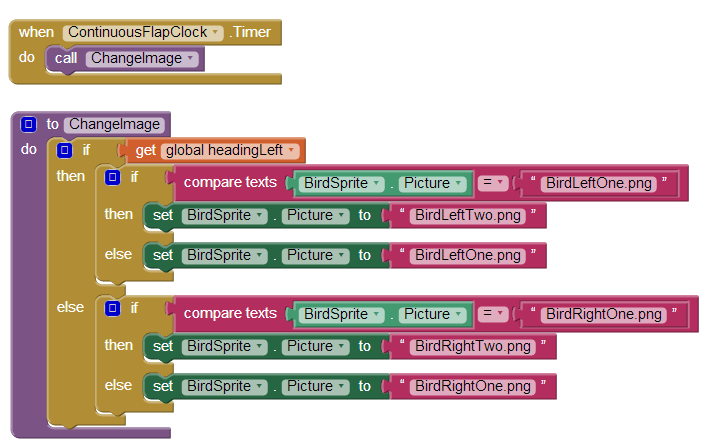
We simply call another procedure that we defined named ChangeImage. This procedure needs to know the direction of the bird. This is why we enable ContinuousFlapClock after we call SetupGame. If ChangeImage procedure sees headingLeft is set to true, it then checks if current image is BirdLeftOne.png, if so it changes it to BirdLeftTwo.png to make the bird appear to be flapping. If it's the second image, it changes it to the first one. It does the opposite if the headingLeft is false. Now, we are waiting for player to tap to start playing. How do we start the game and control after it starts? Well, we do it whenever there's a touch on the canvas. App Inventor calls Screen1.Initialize at the beginning of an app launch, the same way it listens to any touch on a canvas through GameCanvas.Touched event whenever player touches the canvas.
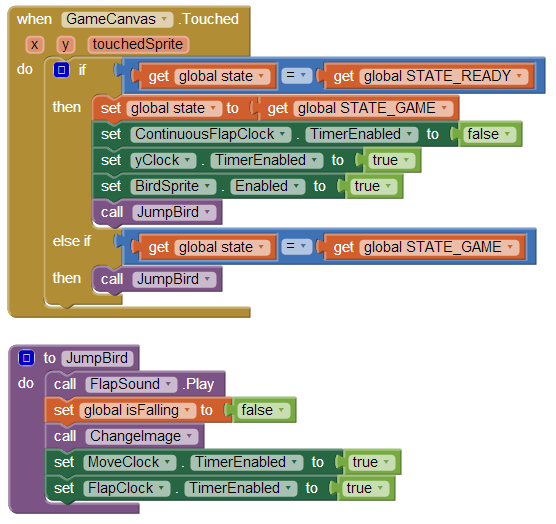
We only care about a user touch when our game is in either ready or game state. When in ready state and user taps for the first time, we change the state to game state. We stop continuous flapping of the bird by disabling that clock. We enable yClock. We will see in a bit what it does. We also enable the bird so it can now move to a direction depending on its current heading. Whenever there's a touch, we make the bird jump meaning we change its Y value. For moving along x-axis, we did set bird's heading; and in design view we also set the speed to be 5. In JumpBird procedure, we play the flap sound. We set isFalling to false since we are jumping, not falling. We change the image like we explained for continuous flapping. We enable both MoveClock and FlapClock.
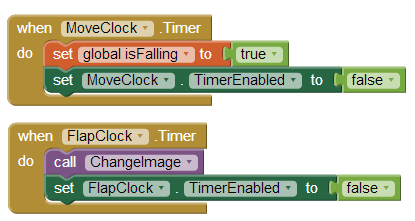
If you recall what I mentioned about the clocks we have at the beginning of this tutorial, you know MoveClock controls how long the bird can fly up when the player taps the screen. When MoveClock is fired, we stop flying up and set isFalling to true so the bird will descend. In FlapClock's Timer event, we change the current bird's image and disable the timer as we do not want it to flap continuously. What makes the bird actually move up or down? Answer is yClock. Again, yClock is to control bird's location on y-axis which has an interval set to 0. So, when it's enabled, it fires continuously and does this-
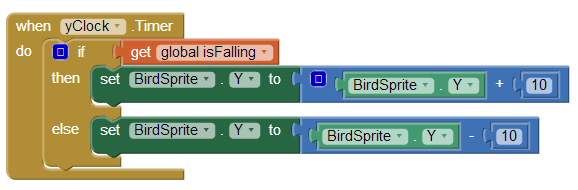
If our bird should fall, we increase its Y value since a Canvas' (0, 0) position is at top left. If the Y is equal to the height of the canvas, the bird will be at the bottom. We do the opposite if we are going up. You might be wondering why didn't we enable/disable yClock in JumpBird procedure instead. It's because when we are in game state, we do not intend to disable yClock. The bird is constantly moving either up or down. Also JumpBird procedure as its name implies should not make the bird fall too. We are close. The bird jumps when player taps and falls if player doesn't tap. Now we need to handle what happens when our bird reaches the left or right edge.
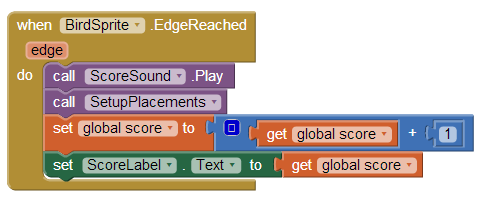
Whenever the bird reaches left or right edge, player makes a score. So we play score sound. We call SetupPlacements to place 4 spike obstacles on the other side. We explained what this procedure does a while ago. We add 1 to the score and update score label to display the new score. Unfortunately we have to make its cuteness die if it bumps on any of the 6 spikes (top, bottom, and 4 obstacles spikes). In order to do that we need to check if it's colliding with any of them-
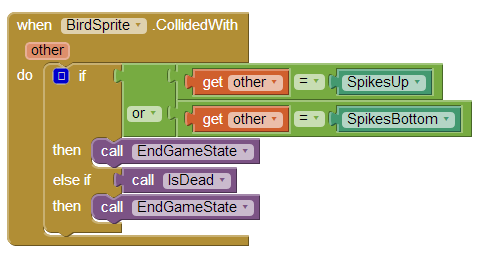
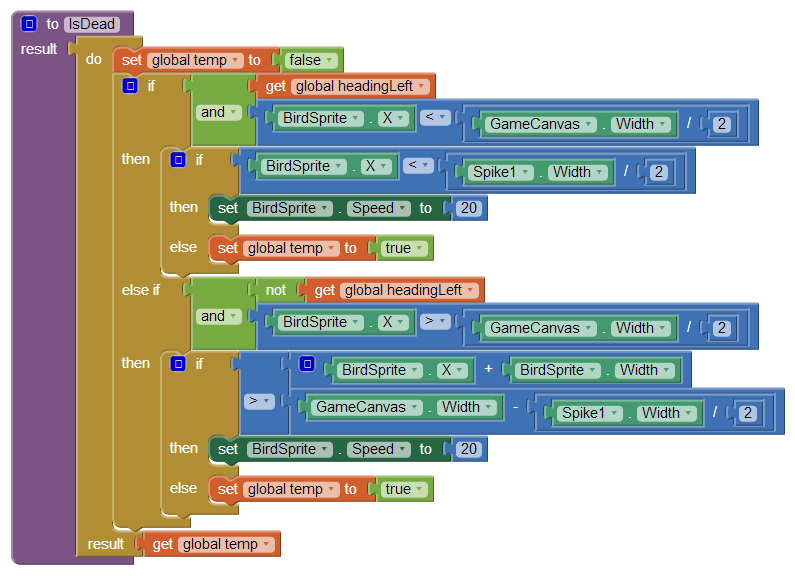
We will see EndGameState procedure in a bit. For now just think, it's the end of the game. If bird collides with either top or bottom spike, we make the bird die right away. For the obstacle spikes, we give a little leverage. We call isDead procedure. If bird collides with any of the four obstacles, we check first if it is moving left and not too far (less than middle of the screen), and then we see if it crossed the obstacle half way through, if it did, we let it live. After it is half way through and then collides with any other above or below, we don't kill it either. We increased its speed to hit edge faster so it doesn't keep colliding. This is why we had to reset the speed to 5 in SetupPlacements procedure. We do the similar thing for the right edge. IsDead returns true if we need to end the game, otherwise returns false.

Unfortunately bird died. Let the world know. Play the death sound. We need to show the menu screen. This time we will change the PlaySprite's image to retry image (RetryButton.png). If current score is higher than the best score if any, we set bestScore to current score. Then we save it to the database. We hide all game components. We disable what's not visible. We change the state. If we didn't play before or didn't score even 1, we do not have a best score. In that case, we just show the current score. Otherwise we show both side by side.
If you are still with me and didn't skip any part of this tutorial, I bet you really are going to make something awesome someday. Did you realize we just made a game? I applaud your efforts getting this far. Remember, this is a tutorial to get you started. No one can stop you from enhancing the game or start something completely new. All the best!
If you want me to make more tutorials like this, support me by downloading and rating our Games.
Download the project OhMySpikes.aia, import, and try on a device.