ListView component allows you to display a list/group of text items on a screen. If you are here for List tutorial, please visit this extensive List tutorial. Today we are going to create an app utilizing ListView, a simple booking app. The name of our glorious app will be AI Palace. This is how it's going to look like-
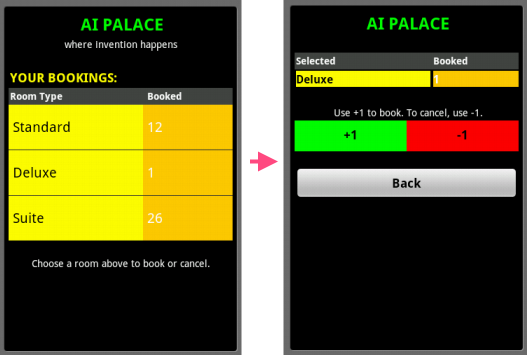
Functionality of this app is simple. A user can book a room in our AI Palace which gets stored in a database. They can also cancel their bookings. Since we store it in a database, when the user closes the app and reopens it, they will still be able to see their bookings.
Ok, let's get started. I am not going to explain the user interface. So, please download the bare-bone project of this app first. This minimal project doesn't have any blocks, just the design of the app.
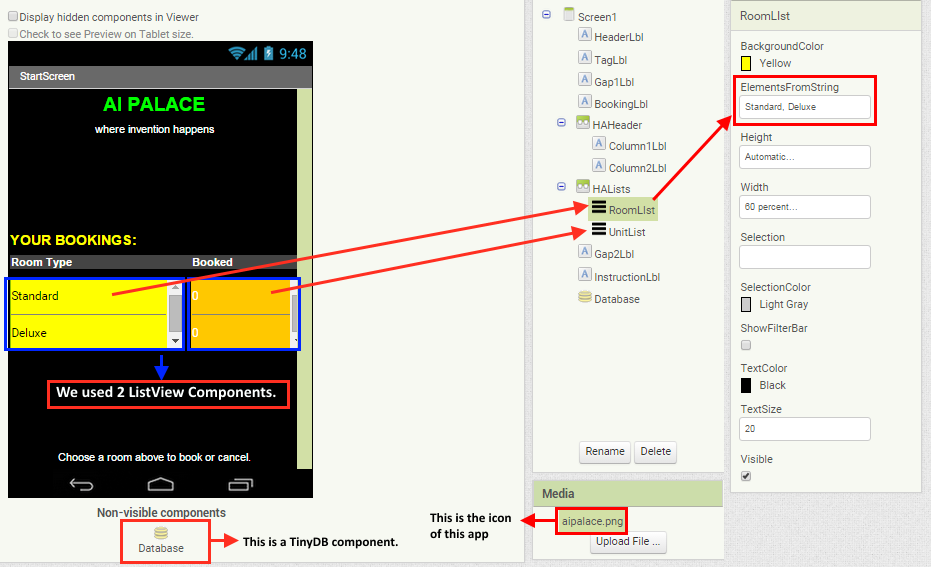
We have 2 screens. Screen1 is our default screen where a user can see their current bookings if they have any. We have another screen named ActionScreen where a user can book or cancel room units. A user can have as many units they want for a room type. In the design view, Screen1 looks like this (excluding the red marks and comments of course)-
If you cannot see the above image clearly, click on it to view in its original size.
We used 2 ListView components. RoomList shows the list of room types and the UnitList shows how many units the user booked for a particular room type. If you take a look at the top right of the above image, you will see ElementsFromString where we put Standard, Deluxe. What you put there separated by comma, shows in the list view. This is one way to add items that you want ListView to display. We will show you another way of doing this shortly.
So, when our app starts/initiates, we show Screen1 which is our default screen. We want to show if the user already has some bookings in this screen. Since we use TinyDB to store bookings, we can check if any data exists in our database. If exists, we pull up the relevant data and display.
First, let's declare some variables-
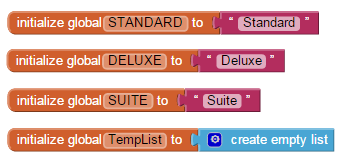
We will have three types of rooms. Standard, Deluxe, and Suite. We haven't added Suite in our design view. That is why it doesn't show up yet. The reason we declared 3 variables is because we don't want to type them multiple types and make spelling errors. Also notice that I used all upper case for variable names to declare all 3 of them. This is just a convention different programming languages use for declaring variables if their values will never change throughout the app. TempList contains an empty list for now. But we will change its value later.
This is what we do when our app initiates-
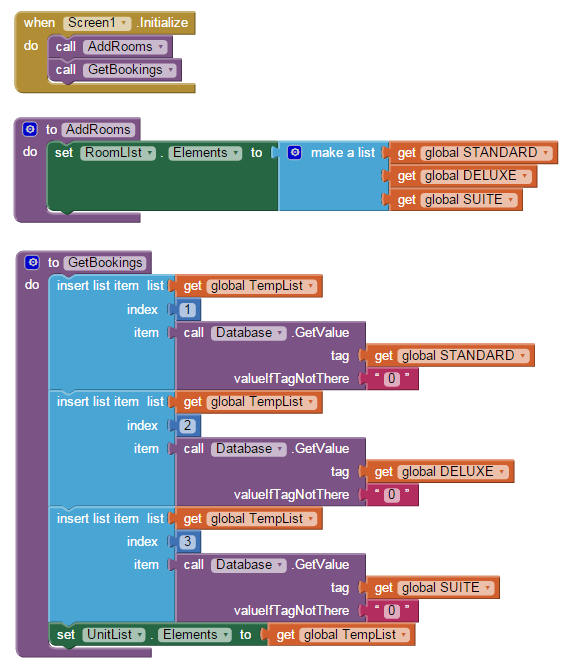
We call 2 procedures. AddRooms procedure populates the content of our RoomList ListView. We showed you before adding items by using ElementsFromString in design view. The above image shows doing it using blocks. Elements property of a ListView takes a List of items and display. Remember this operation overrides whatever items you previously put during design time using ElementsFromString.
GetBooking procedure checks if a TinyDB exists and contains 3 given tags - Standard, Deluxe, and Suite. If all or any of them do, it reads the value stored there for respective tags. The value is the number of units booked for a particular room. If not found, we set 0 as the default value by passing 0 in valueIfTagNotThere slot. If the app is launched for the very first time, obviously they will have a value of 0. We store the values into our TempList at correct index. Note that we use index 1 for Standard, 2 for Deluxe, and 3 for Suite. This is the order we would like our list view to follow. Finally, we populate the UnitList ListView's Elements property with TempList.
When a user taps on any of the room type, we want them to be able to book or cancel a room. A user can book many units of a room type. Here's the event that is triggered when a user taps on a RoomList item-

This opens ActionScreen with the value being the selected room type. We will need this value at the very start of ActionScreen.
This is the design view of our ActionScreen-
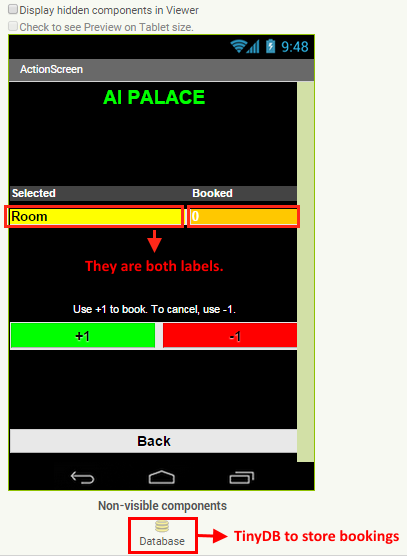
In this screen, we want to display first what room type they selected on Screen1 and if they have any existing booking for that room type. Let's declare some variables in ActionScreen-
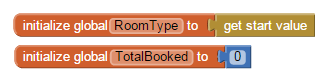
We got and attached get start value block to RoomType from Control block in Blocks editor. If you remember, we passed this value from Screen1 when we opened this screen.
TotalBlocked variable will hold total units booked by a user for the chosen room type. Initially we set it to 0.
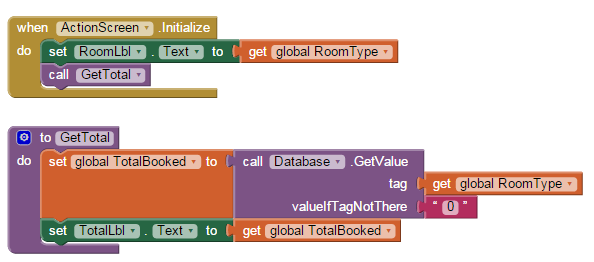
On initialization, we first update our RoomLbl to display what room type was selected in the previous screen (Screen1). Then we call a procedure named GetTotal. GetTotal procedure first checks if any data exists for the selected room type. If it does, we store it to TotalBooked variable and display it on TotalLbl. If it doesn't exists we show 0 just the way we did in Screen1's GetBookings procedure.
Now we want the user to be able to book or cancel by using corresponding buttons-
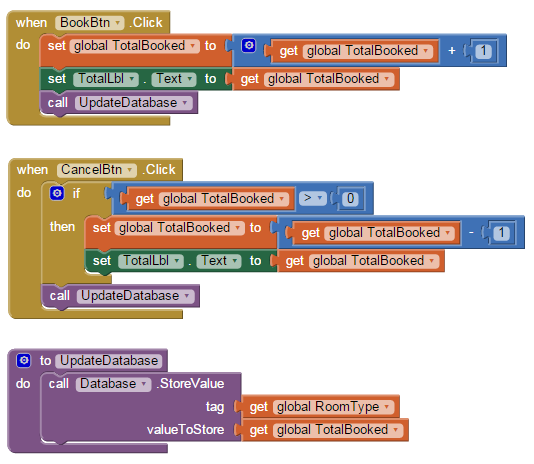
When a user taps on BookBtn, we increment TotalBooked variable's value by 1. Then we update the correct label to display it. Finally we update the database by calling UpdateDatabase procedure. This procedure stores the value of TotalBooked to the specific room type tag. For instance, if the user chose Standard room type on Screen1 and they pressed BookBtn 5 times, UpdateDatabase will store 5 with the tag 'Standard'.
CancelBtn click event does the opposite. It subtracts 1 from TotalBooked. Before it does that, it checks first if the value of TotalBooked is greater than 0. If we subtract 1 from 0, the value will be negative which doesn't make sense in this app's context. After that, it also updates the label and database just like BookBtn's click event.
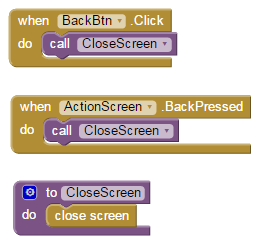
We need to close ActionScreen if the user presses back button in our app or they press hardware back button. Since both events do the same, we put the close operation in a separate procedure and call it from both BackBtn.Click and ActionScreen.BackPressed events.
Here's the complete project for you to download and play with.